spring bean 生命周期
2019-12-03 网络 spring spring- content
Spring的生命周期是指实例化Bean时所经历的一系列阶段,即通过getBean()获取bean对象及设置对象属性时,Spring框架做了哪些事。Bean的生命周期从Spring容器实例化Bean到销毁Bean。 本文分别对 BeanFactory 和 ApplicationContext 中的生命周期进行分析。
一、BeanFactory实例化Bean相关接口
Bean级生命周期接口:(4个)
1、BeanNameAware
//待对象实例化并设置属性之后调用该方法设置BeanName
void setBeanName(String beanName);
2、BeanFactoryAware
//待调用setBeanName之后调用该方法设置BeanFactory,BeanFactory对象默认实现类是DefaultListableBeanFactory
void setBeanFactory(BeanFactory var1) throws BeansException;
3、InitializingBean
//实例化完成之后调用(调用了BeanPostProcessor.postProcessBeforeInitialization方法之后调用该方法)
void afterPropertiesSet() throws Exception;
4、DisposableBean
//关闭容器时调用
void destroy() throws Exception;
这4个接口都在包 org.springframework.beans.factory 下,它们是Bean级生命周期接口,这些接口由Bean类直接实现。
容器级Bean生命周期接口:(2个)
1、抽象类:InstantiationAwareBeanPostProcessorAdapter
实例化前/后,及框架设置Bean属性时调用该接口。可覆盖的常用方法有:
//在Bean对象实例化前调用
@Override
public Object postProcessBeforeInstantiation(Class<?> beanClass, String beanName) throws BeansException;

//在Bean对象实例化后调用(如调用构造器之后调用)
@Override
public boolean postProcessAfterInstantiation(Object bean, String beanName) throws BeansException;

/**
 * 在设置某个属性前调用,然后再调用设置属性的方法
 * 注意:这里的设置属性是指通过配置设置属性,直接调用对象的setXX方法不会调用该方法,如bean配置中配置了属性address/age属性,将会调用该方法
 * @param pvs 如 PropertyValues: length=2; bean property 'address'; bean property 'age'
 */
@Override
public PropertyValues postProcessPropertyValues(PropertyValues pvs, PropertyDescriptor[] pds, Object bean, String beanName) throws BeansException;
2、接口:BeanPostProcessor
实例化完成之后调用该接口。可实现的接口方法有:
//实例化完成,setBeanName/setBeanFactory完成之后调用该方法
public Object postProcessBeforeInitialization(Object o, String s) throws BeansException;

//全部实例化完成以后调用该方法
public Object postProcessAfterInitialization(Object o, String s) throws BeansException;
这两个接口都在包 org.springframework.beans.factory.config 下,一般称它们的实现类为“后处理器”。后处理器接口一般不由Bean本身实现,实现类以容器附加装置的形式注册到Spring容器中。 当Sprig容器创建任何Bean的时候,这两个后处理器都会发生作用,所以这两个后处理器的影响是全局的。用户可以通过合理的代码控制后处理器只对固定的Bean创建进行处理。 Bean级生命周期接口解决Bean个性化处理的问题,Bean容器级生命周期接口解决容器中某些Bean共性化处理的问题。
3、BeanFactoryPostProcessor
其实BeanFactoryPostProcessor也算是一个容器级别的接口,可以对bean的definition做一些自定义的事情,比如修改属性之类
二、BeanFactory的bean生命周期相关代码
1、xml bean 配置
<bean id="person" class="demo02.bean.Person"
      p:address="上海市"
      p:age="25"
      init-method="myInit"
      destroy-method="myDestroy"
      />
p:address/p:age 在实例化的时候会调用Bean的对应setXX方法设置属性。
2、java相关代码
InstantiationAwareBeanPostProcessorAdapter实现类相关代码
/**
 * 实例化前/后,及框架设置Bean属性时调用该接口
 */
public class MyInstantiationAwareBeanPostProcessor extends InstantiationAwareBeanPostProcessorAdapter {

    //在Bean对象实例化前调用
    @Override
    public Object postProcessBeforeInstantiation(Class<?> beanClass, String beanName) throws BeansException {
        //仅对容器中的person bean处理
        if ("person".equals(beanName)) {
            System.out.println("实例化前调用:InstantiationAwareBeanPostProcessorAdapter.postProcessBeforeInstantiation");
        }
        return null;
    }

    //在Bean对象实例化后调用(如调用构造器之后调用)
    @Override
    public boolean postProcessAfterInstantiation(Object bean, String beanName) throws BeansException {
        //仅对容器中的person bean处理
        if ("person".equals(beanName)) {
            System.out.println("实例化后调用:InstantiationAwareBeanPostProcessorAdapter.postProcessAfterInstantiation");
        }
        return true;
    }

   /**
    * 在设置某个属性前调用,然后再调用设置属性的方法
    * 注意:这里的设置属性是指通过配置设置属性,直接调用对象的setXX方法不会调用该方法,如bean配置中配置了属性address/age属性,将会调用该方法
    * @param pvs 如 PropertyValues: length=2; bean property 'address'; bean property 'age'
    */
    @Override
    public PropertyValues postProcessPropertyValues(PropertyValues pvs, PropertyDescriptor[] pds, Object bean, String beanName) throws BeansException {
        //仅对容器中的person bean处理
        if ("person".equals(beanName)) {
            System.out.println("在Bean设置属性时调用:InstantiationAwareBeanPostProcessorAdapter.postProcessPropertyValues,设置值为" + pvs);
        }
        return pvs;
    }
}
BeanPostProcessor实现类相关代码
/**
 * 实例化完成之后调用该接口
 */
public class MyBeanPostProcessor implements BeanPostProcessor {

    //实例化完成,setBeanName/setBeanFactory完成之后调用该方法
    public Object postProcessBeforeInitialization(Object o, String s) throws BeansException {
        if ("person".equals(s)) {
            Person person = (Person) o;
            if (person.getName() == null) {
                System.out.println("调用BeanPostProcessor.postProcessBeforeInitialization,name为空,设置默认名为无名氏");
                person.setName("无名氏");
            }
        }
        return o;
    }

    //全部是实例化完成以后调用该方法
    public Object postProcessAfterInitialization(Object o, String s) throws BeansException {
        if ("person".equals(s)) {
            Person person = (Person) o;
            if (person.getAge()>20) {
                System.out.println("调用BeanPostProcessor.postProcessAfterInitialization,age大于20,调整为20");
                person.setAge(20);
            }
        }
        return o;
    }
}
BeanFactoryLifeCycleMain 容器装载配置文件并启动
/**
 * BeanFactory中的Bean的生命周期
 * 容器装载配置文件,注册 BeanPostProcessor 和 InstantiationAwareBeanPostProcessorAdapter 后置处理器
 */
public class BeanFactoryLifeCycleMain {

    @Test
    public void lifeCycleInBeanFactory() {
        //装载配置文件并启动容器
        Resource resource = new ClassPathResource("beans/beans.xml");
        BeanFactory beanFactory = new DefaultListableBeanFactory();
        XmlBeanDefinitionReader reader = new XmlBeanDefinitionReader((DefaultListableBeanFactory) beanFactory);
        reader.loadBeanDefinitions(resource);

        //向容器中注册后处理器 MyBeanPostProcessor
        ((DefaultListableBeanFactory) beanFactory).addBeanPostProcessor(new MyBeanPostProcessor());

        //向容器中注册后处理器 MyInstantiationAwareBeanPostProcessor
        //注意:后处理器调用顺序和注册顺序无关。在处理多个后处理器的情况下,必需通过实现Ordered接口来确定顺序
        ((DefaultListableBeanFactory) beanFactory).addBeanPostProcessor(new MyInstantiationAwareBeanPostProcessor());

        //第一次从容器中获取Person,将触发容器实例化该bean,这将引发Bean生命周期方法的调用
        Person person = (Person) beanFactory.getBean("person");
        person.introduce();
        person.setName("zhangsan");

        //第二次从容器中获取,直接从缓存中获取(默认就是单例)
        Person person2 = (Person) beanFactory.getBean("person");
        System.out.println(person == person2);//true

        //关闭容器
        ((DefaultListableBeanFactory) beanFactory).destroySingletons();
    }
}
执行结果:(DEBUG信息为Spring框架输出的,说明了底层调用方法和作用)
实例化前调用:InstantiationAwareBeanPostProcessorAdapter.postProcessBeforeInstantiation 调用了Person的无参构造器 DEBUG 2018-08-02 13:51:07: [org.springframework.beans.factory.support.DefaultListableBeanFactory.(523)doCreateBean] - Eagerly caching bean ‘person’ to allow for resolving potential circular references 实例化后调用:InstantiationAwareBeanPostProcessorAdapter.postProcessAfterInstantiation 在Bean设置属性时调用:InstantiationAwareBeanPostProcessorAdapter.postProcessPropertyValues,设置值为PropertyValues: length=2; bean property ‘address’; bean property ‘age’ 调用了setAddress方法设置了属性 调用了setAge方法设置了属性 调用了BeanNameAware.setBeanName, value is person 调用了BeanFactoryAware.setBeanFactory, value is org.springframework.beans.factory.support.DefaultListableBeanFactory@44c8afef: defining beans [car,person]; root of factory hierarchy 调用BeanPostProcessor.postProcessBeforeInitialization,name为空,设置默认名为无名氏 调用了setName方法设置了属性 DEBUG 2018-08-02 13:51:07: [org.springframework.beans.factory.support.DefaultListableBeanFactory.(1595)invokeInitMethods] - Invoking afterPropertiesSet() on bean with name ‘person’ 调用InitializingBean.afterPropertiesSet DEBUG 2018-08-02 13:51:07: [org.springframework.beans.factory.support.DefaultListableBeanFactory.(1653)invokeCustomInitMethod] - Invoking init method ‘myInit’ on bean with name ‘person’ 调用bean配置的init-method 调用BeanPostProcessor.postProcessAfterInitialization,age大于20,调整为20 调用了setAge方法设置了属性 DEBUG 2018-08-02 13:51:07: [org.springframework.beans.factory.support.DefaultListableBeanFactory.(477)createBean] - Finished creating instance of bean ‘person’ 调用了introduce方法–> name:无名氏,age:20,address:中国 调用了setName方法设置了属性 DEBUG 2018-08-02 13:51:07: [org.springframework.beans.factory.support.DefaultListableBeanFactory.(249)doGetBean] - Returning cached instance of singleton bean ‘person’ true DEBUG 2018-08-02 13:51:07: [org.springframework.beans.factory.support.DefaultListableBeanFactory.(474)destroySingletons] - Destroying singletons in org.springframework.beans.factory.support.DefaultListableBeanFactory@44c8afef: defining beans [car,person]; root of factory hierarchy DEBUG 2018-08-02 13:51:07: [org.springframework.beans.factory.support.DisposableBeanAdapter.(244)destroy] - Invoking destroy() on bean with name ‘person’ 调用DisposableBean.destroy DEBUG 2018-08-02 13:51:07: [org.springframework.beans.factory.support.DisposableBeanAdapter.(322)invokeCustomDestroyMethod] - Invoking destroy method ‘myDestroy’ on bean with name ‘person’ 调用bean配置的destroy-method
BeanFactory的Bean生命周期执行步骤如下:
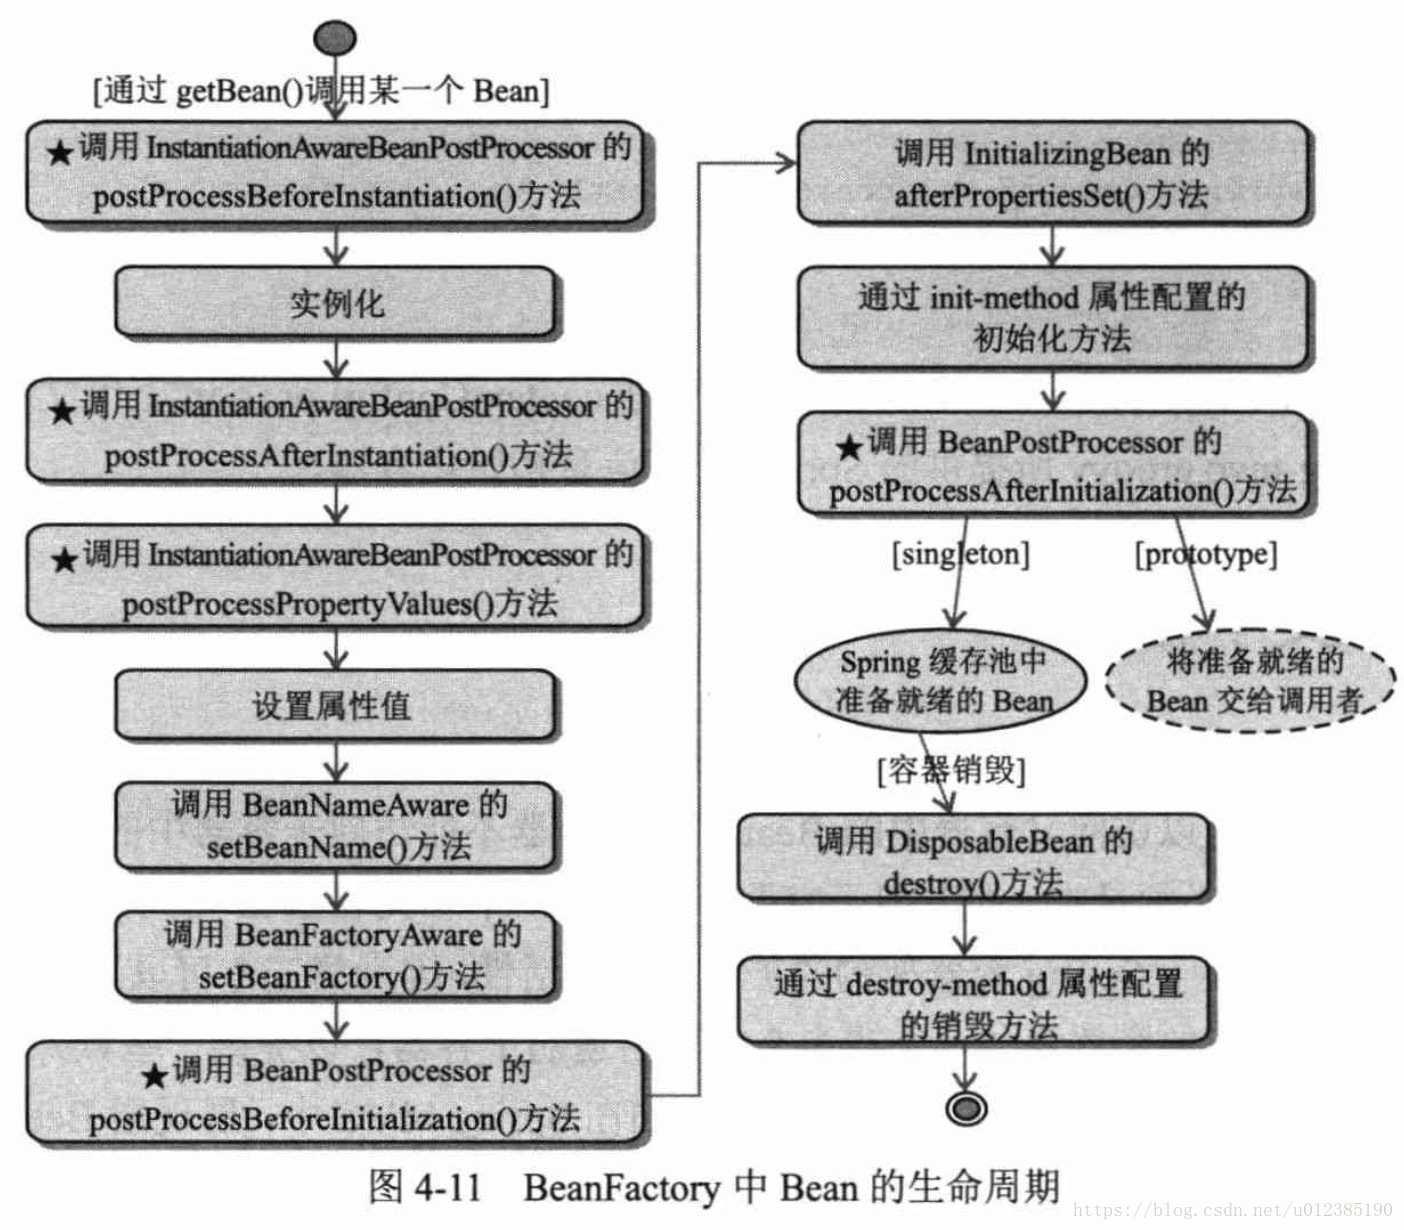
三、关于BeanFactory的Bean生命周期接口的总结
- 1、通过实现BeanFactory的Bean生命周期相关接口,虽然让Bean具有了更详细的生命周期阶段,但是也让Spring框架和Bean紧密联系在了一起,同时也增加了代码复杂度。因此,如果用户希望在Bean的生命周期中实现自己的业务,不需要和特定框架关联,可以通过 bean 的 init-method 和 destroy-method 配置方法来进行业务实现。
- 2、Spring还拥有一个Bean后置处理器InitDestroyAnnotationBeanPostProcessor,它负责对标注了 @PostConstruct 和 @PreDestroy 的 Bean 进行处理,在 Bean 初始化及销毁前执行相应的业务逻辑。
- 3、通常情况下,可以抛弃Bean级的生命周期的4个接口,用更加方便的方法进行代替(如1、2点中的方法)。但是容器级Bean生命周期接口可以合理的使用,处理一些共同的业务。
- 4、当bean的Scope为非单例,对象销毁的时候,Spring容器不会帮我们调用任何方法,因为是非单例,这个类型的对象有很多个,Spring容器一旦把这个对象交给你之后,就不再管理这个对象了。如果bean的scope设为prototype时,当容器关闭时,destroy方法不会被调用。对于prototype作用域的bean,Spring不能对一个该bean的整个生命周期负责:容器在初始化、配置、装饰或者是装配完一个prototype实例后,将它交给客户端,随后就对该prototype实例不闻不问了。
四、ApplicationContext的Bean生命周期
- 1、Bean在应用上下文中的生命周期和在BeanFactory中生命周期类似,可以实现所有的BeanFactory的Bean级和容器级生命周期接口。但是,如果Bean实现了org.springframework.context.ApplicationContextAware接口,会增加一个调用该接口方法setApplicationContext()的步骤。
- 2、如果配置文件中声明了工厂后处理器接口BeanFactoryPostProcessor的实现类,则应用上下文在装载配置文件之后初始化Bean实例之前将调用这些BeanFactoryPostProcessor对配置信息进行加工处理。Spring框架提供了多个工厂后处理器如CustomEditorConfigurer、PopertyPlaceholderConfigurer等。如果配置文件中定义了多个工厂后处理器,最好让它们实现org.springframework.core.Ordered接口,以便Spring以确定的顺序调用它们。工厂后处理器是容器级的,仅在应用上下文初始化时调用一次,其目的是完成一些配置文件的加工处理工作。 注意:BeanFactoryPostProcessor的接口方法参数是BeanFactory,而在BeanFactory级Bean生命周期中提到的BeanPostProcessor接口方法参数是Bean对象和Bean的ID值。所以前者是针对应用上下文的,后者是针对BeanFactory的。
- 3、ApplicationContext和BeanFactory另一个最大的不同之处在于:前者会利用Java反射机制自动识别出配置文件中定义的BeanPostProcessor、InstantiationAwareBeanPostProcessor和BeanFactoryPostProcessor,并自动将它们注册到应用上下文中;而后者需要在代码中通过手工调用addBeanPostProcessor()方法进行注册。这也是为什么在应用开发时,我们普遍使用ApplicationContext而很少使用BeanFactory的原因之一。
- 4、在ApplicationContext中,我们只需要在配置文件中通过
<bean>定义工厂后处理器和Bean后处理器,它们就会按预期的方式运行。
五、ApplicationContext的Bean生命周期代码演示
1、java代码
实现BeanFactoryPostProcessor接口方法
/**
 * ApplicationContext bean生命周期演示
 */
public class MyBeanFactoryPostProcessor implements BeanFactoryPostProcessor {

    //先调用本方法,将所有bean生成BeanDefinition对象并设置相关属性。
    //本方法运行完之后,会调用bean构造器,并调用set相关属性方法
    public void postProcessBeanFactory(ConfigurableListableBeanFactory beanFactory) throws BeansException {
        BeanDefinition beanDefinition = beanFactory.getBeanDefinition("person");
        beanDefinition.getPropertyValues().addPropertyValue("address", "王二麻子");
        System.out.println("调用了BeanFactoryPostProcessor.postProcessBeanFactory");
    }
}
ApplicationContext在启动时,将首先为配置文件中每个<bean>生成一个BeanDefinition对象,BeanDefinition是<bean>在Spring容器中的内部表示。当配置文件中所有的<bean>都被解析成BeanDefinition时,ApplicationContext将调用工厂后处理器的方法,因此我们有机会通过程序的方式调整Bean的配置信息。如上对person的属性address进行更改设置。
2、xml 相关配置
<!--1、注册Bean-->
<bean id="person" class="demo02.bean.Person"
      p:address="上海市"
      p:age="25"
      init-method="myInit"
      destroy-method="myDestroy"
      />
<!--下面注册bean后处理器是为了演示ApplicationContext bean生命周期的。-->
<!--ApplicationContext和BeanFactory另一个最大的不同之处在于:
前者会利用Java反射机制自动识别出配置文件中定义的BeanPostProcessor、InstantiationAwareBeanPostProcessor和BeanFactoryPostProcessor,并自动将它们注册到应用上下文中;
而后者需要在代码中通过手工调用addBeanPostProcessor()方法进行注册。-->
<!--2、注册Bean后处理器-->
<bean id="myBeanPostProcessor" class="demo02.BeanFactoryLifeCycle.MyBeanPostProcessor"/>
<!--3、注册Bean后处理器-->
<bean id="myBeanFactoryPostProcessor" class="demo02.BeanFactoryLifeCycle.MyBeanFactoryPostProcessor"/>
②和③处定义的BeanPostProcessor和BeanFactoryPostProcessor会自动被ApplicationContext识别并注册到容器中。②处注册的工厂后处理器将会对①处配置的属性值进行调整。在③处,我们还声明了一个Bean后处理器,它也可以对Bean的属性进行调整。启动容器并查看car Bean的信息,我们将发现car Bean的brand属性成功被工厂后处理器更改了。
3、测试类
/**
 * ApplicationContext bean生命演示
 */
public class ApplicationContexBeanLifeCycleMain {
    public static void main(String[] args) {
        //ApplicationContext applicationContext = new ClassPathXmlApplicationContext("beans/beans.xml");
        //ApplicationContext 接口中没有实现close方法,所以可以用该类(该类是实现了ConfigurableApplicationContext接口和DisposableBean接口)
        AbstractApplicationContext applicationContext = new ClassPathXmlApplicationContext("beans/beans.xml");
        Person person = (Person) applicationContext.getBean("person");
        person.introduce();
        applicationContext.close();
    }
}
4、运行结果
最后输出:
调用了BeanFactoryPostProcessor.postProcessBeanFactory 调用了Person的无参构造器 调用了setAddress方法设置了属性,上海市 调用了setAge方法设置了属性,25 调用了setName方法设置了属性,王二麻子 调用了BeanNameAware.setBeanName, value is person 调用了BeanFactoryAware.setBeanFactory, value …… 调用InitializingBean.afterPropertiesSet 调用bean配置的init-method 调用BeanPostProcessor.postProcessAfterInitialization,age大于20,调整为20 调用了setAge方法设置了属性,20 调用了introduce方法–> name:王二麻子,age:20,address:中国 调用DisposableBean.destroy 调用bean配置的destroy-method
六、总结
- 1、Spring的生命周期可以从 BeanFactory 和 ApplicationContext 中的生命周期进行分析;
- 2、BeanFactory实例化Bean相关接口分为Bean级和容器级。bean级接口我们一般不实现,容器级如果需要处理一些共有特性,可以考虑实现;
- 3、ApplicationContext中bean的生命周期与BeanFactory类似。beanFactory中的后处理器接口需要调用addBeanPostProcessor方法进行注册,而ApplicationContext中的后处理器可以通过配置和反射进行调用;
- 4、从上可以看到Bean的生命周期相关接口很多,如果都实现很复杂。通常我们的业务都可以通过 init-method 和 destory-method 方法配置来解决,这样做简单粗暴。
补充
bean初始化和销毁的三种方式
在spring容器中有三种方式自定义bean初始化和销毁前所做的操作:
- 第一种【推荐】:通过@PostConstruct 和 @PreDestroy 方法 实现初始化后和销毁bean之前进行的操作,可以替代下面两种方式
PostConstruct注解依靠CommonAnnotationBeanPostProcessor的父类InitDestroyAnnotationBeanPostProcessor执行,当你启动注解功能
<context:annotation-config/>会自动帮你注册CommonAnnotationBeanPostProcessor。当bean初始化的时候(对应方法AbstractAutowireCapableBeanFactory.initializeBean),会执行applyBeanPostProcessorsBeforeInitialization方法:所有注册的BeanPostProcessors的postProcessBeforeInitialization方法都会被执行(你的PostConstruct注解的执行就在这里面的InitDestroyAnnotationBeanPostProcessor.postProcessBeforeInitialization方法)
- 第二种是:通过 在xml中定义init-method 和 destory-method方法
- 第三种是:通过bean实现InitializingBean和 DisposableBean接口
bean的作用域
xml scope配置
- 1、singleton
<bean id="demo" class="com.foo.DemoBean" scope="singleton">
<bean id="demo" class="com.foo.DemoBean" singleton="true"/>
- 2、prototype
<bean id="demo" class="com.foo.DemoBean" scope="prototype"/>
<bean id="demo" class="com.foo.DemoBean" singleton="false"/>
- 3、request、session、global session
这三种作用域仅在web应用中使用,普通spring应用无效
@Scope注解配置
除去xml配置方式外,还可以使用注解配置的方式指定bean的作用域
@Configuration
public class MainConfig2 {
    //@Scope(value = WebApplicationContext.SCOPE_REQUEST)
    //@Scope(value = WebApplicationContext.SCOPE_SESSION)
    //@Scope(value = WebApplicationContext.SCOPE_GLOBAL_SESSION)
    //@Scope(value = ConfigurableBeanFactory.SCOPE_PROTOTYPE)
    @Scope(value = ConfigurableBeanFactory.SCOPE_SINGLETON)
    @Bean(name = "person")
    public Person person(){
        Person person = new Person();
        return person;
    }
}
循环依赖
- 通过构造函数循环依赖,不允许
- 通过setter方式循环依赖,默认bean是单例的,允许,bean被实例化之后才设置setter属性,单例会被先放入缓存(map对象),A依赖B,B依赖A,A和B都实例化完成了放入缓存了,然后才调用set方法设置依赖,这个时候直接从缓存中拿引用就可以了,避免了循环依赖报错
- 通过setter方式循环依赖,bean为prototype非单例,不允许
参考
参考书籍:《精通Spring4.x企业应用开发实战》
FactoryBean BeanFactory
2019-11-28 网络 spring spring- content
总结FactoryBean以及BeanFactory相关的知识点
FactoryBean
一般情况下在spring配置文件或者通过注解的方式就可以定义一个bean加载到spring容器中,当需要加载一个复杂的bean,或者动态加载指定的bean的情况下,可以使用FactoryBean来完成,通过实现FactoryBean.getObject方法自定义实例化bean的过程。例如MyBatis中的SqlSessionFactoryBean就是利用FactoryBean来实现的。
xml配置使用案例
<dependency>
    <groupId>org.springframework</groupId>
    <artifactId>spring-context</artifactId>
</dependency>
public class MyBean {
    private String name;
    private Integer age;

    //getter,setter,toString...
}

public class MyFactoryBean implements FactoryBean<MyBean> {

    private String name;
    private Integer age;

    @Override
    public MyBean getObject() throws Exception {
        MyBean myBean = new MyBean();
        myBean.setName(this.name);
        myBean.setAge(this.age);
        return myBean;
    }

    @Override
    public Class<?> getObjectType() {
        return MyBean.class;
    }

    @Override
    public boolean isSingleton() {
        return true;
    }

    //getter,setter...
}
<!-- factory-bean.xml -->
<?xml version="1.0" encoding="UTF-8"?>
<beans xmlns="http://www.springframework.org/schema/beans"
       xmlns:xsi="http://www.w3.org/2001/XMLSchema-instance"
       xsi:schemaLocation="http://www.springframework.org/schema/beans http://www.springframework.org/schema/beans/spring-beans.xsd">
    <bean id="mybean" class="com.qigang.sblc.factoryBean.MyFactoryBean">
        <property name="name" value="zhangsan"/>
        <property name="age" value="30"/>
    </bean>
</beans>
public class SpringFactoryBeanApplication {
    public static void main(String[] args) {
        ApplicationContext applicationContext = new ClassPathXmlApplicationContext("factory-bean.xml");
        //xml中定义的是MyFactoryBean,但实际从容器拿到的是getObject方法返回的MyBean对象
        MyBean myBean1 = (MyBean) applicationContext.getBean("mybean");
        System.out.println(myBean1);
        MyBean myBean2 = applicationContext.getBean(MyBean.class);
        System.out.println(myBean2);
        System.out.println(myBean1==myBean2);

        //如果想获取到MyFactoryBean本身,在bean名称前加一个&符号即可
        MyFactoryBean myFactoryBean = (MyFactoryBean) applicationContext.getBean("&mybean");
        System.out.println(myFactoryBean);
    }
}
注解使用案例
<dependency>
    <groupId>org.springframework.boot</groupId>
    <artifactId>spring-boot-starter-web</artifactId>
</dependency>
@SpringBootApplication
@RestController
public class SpringBootFactoryBeanApplication {
    @Autowired
    private MyBean myBean;

    public static void main(String[] args) {
        SpringApplication.run(SpringBootFactoryBeanApplication.class,args);
    }

    //单独注入bean,或者在MyFactoryBean上加@Component注解
    @Bean
    public MyFactoryBean getMyFactoryBean(){
        MyFactoryBean myFactoryBean = new MyFactoryBean();
        myFactoryBean.setName("zhangsan");
        myFactoryBean.setAge(20);
        return myFactoryBean;
    }

    @GetMapping("/getMyBean")
    public String getMyBean(){
        return myBean.toString();
    }
}
BeanFactory
BeanFactory基础
接口类图
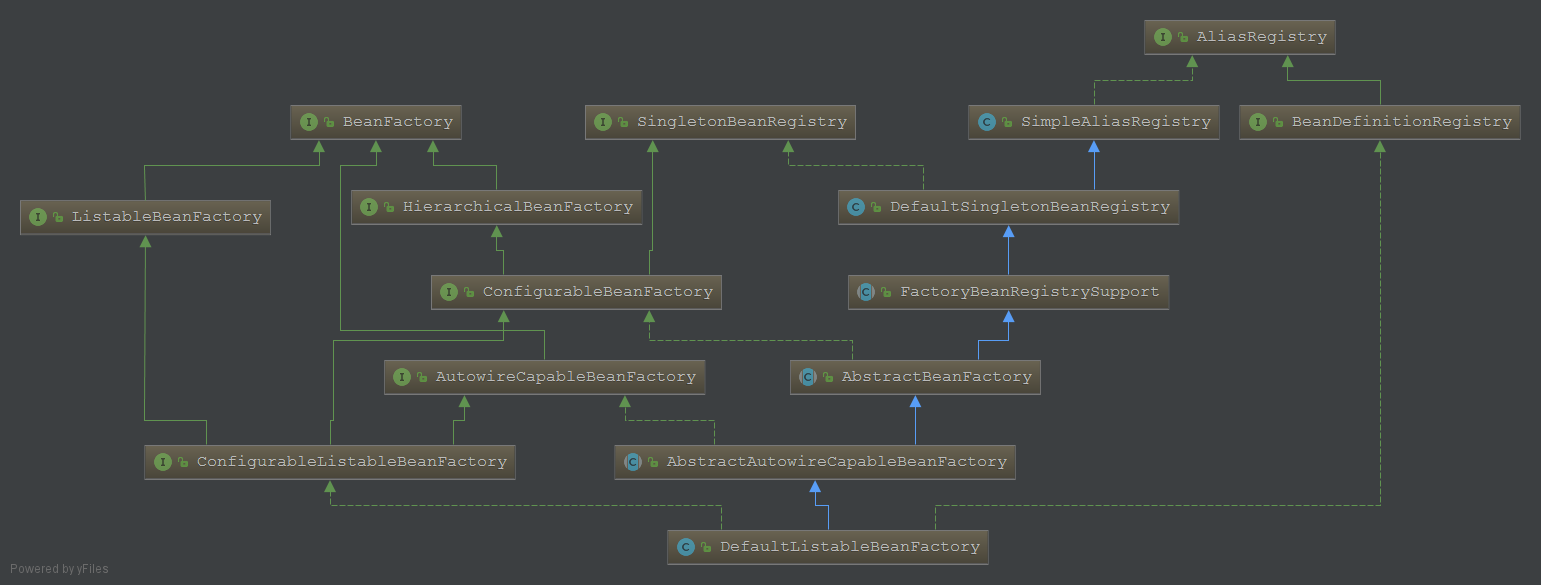
基础实现接口
- ListableBeanFactory 支持bean迭代
- HierarchicalBeanFactory 支持层级
- AutowireCapableBeanFactory 支持自动织入
默认实现类
- DefaultListableBeanFactory(纯粹的IOC容器实现)
//使用默认的DefaultListableBeanFactory来加载bean的简单示例代码
DefaultListableBeanFactory factory = new DefaultListableBeanFactory();
XmlBeanDefinitionReader reader = new XmlBeanDefinitionReader(factory);
reader.loadBeanDefinitions(new ClassPathResource("bean-factory.xml"));
MyBean bean = factory.getBean(MyBean.class);
System.out.println(bean.toString());
BeanDefinition
BeanDefinitionRegistry
DefaultListableBeanFactory是BeanDefinitionRegistry的一个实现,实现方法registerBeanDefinition中将载入的BeanDefinition加入到ConcurrentHashMap中
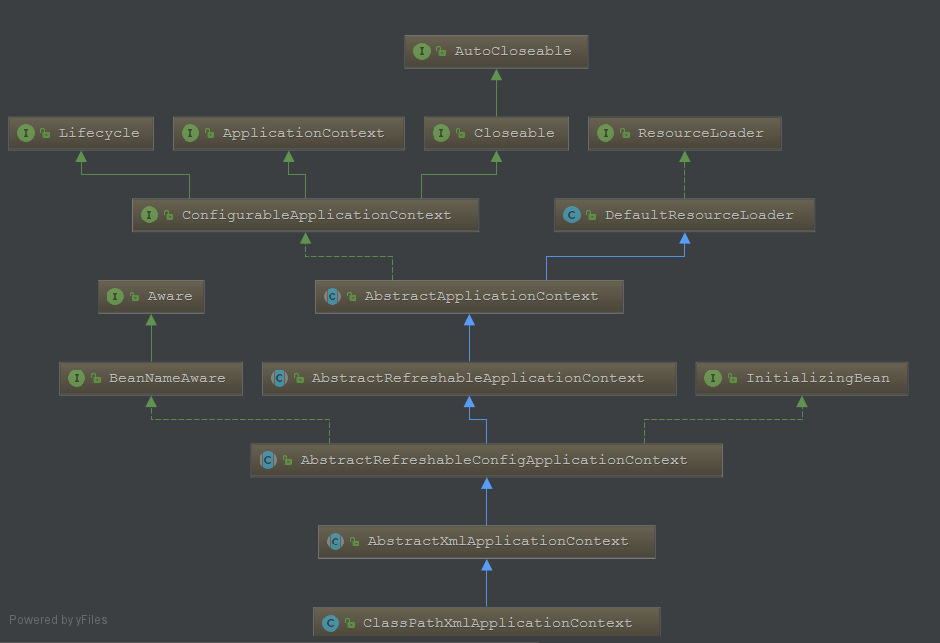
ApplicationContext
类图

AbstractApplicationContext.refresh(IOC初始化的核心方法)
@Override
public void refresh() throws BeansException, IllegalStateException {
    synchronized (this.startupShutdownMonitor) {
        // Prepare this context for refreshing.
        prepareRefresh();

        // Tell the subclass to refresh the internal bean factory.
        //加载BeanDefinition,注册BeanDefinition的逻辑都在这里,默认返回DefaultListableBeanFactory
        ConfigurableListableBeanFactory beanFactory = obtainFreshBeanFactory();

        // Prepare the bean factory for use in this context.
        prepareBeanFactory(beanFactory);

        try {
            // Allows post-processing of the bean factory in context subclasses.
            postProcessBeanFactory(beanFactory);

            // Invoke factory processors registered as beans in the context.
            invokeBeanFactoryPostProcessors(beanFactory);

            // Register bean processors that intercept bean creation.
            registerBeanPostProcessors(beanFactory);

            // Initialize message source for this context.
            initMessageSource();

            // Initialize event multicaster for this context.
            initApplicationEventMulticaster();

            // Initialize other special beans in specific context subclasses.
            onRefresh();

            // Check for listener beans and register them.
            registerListeners();

            // Instantiate all remaining (non-lazy-init) singletons.
            // Bean的实例化在这个方法里面
            finishBeanFactoryInitialization(beanFactory);

            // Last step: publish corresponding event.
            finishRefresh();
        }

        catch (BeansException ex) {
            if (logger.isWarnEnabled()) {
                logger.warn("Exception encountered during context initialization - " +
                        "cancelling refresh attempt: " + ex);
            }

            // Destroy already created singletons to avoid dangling resources.
            destroyBeans();

            // Reset 'active' flag.
            cancelRefresh(ex);

            // Propagate exception to caller.
            throw ex;
        }

        finally {
            // Reset common introspection caches in Spring's core, since we
            // might not ever need metadata for singleton beans anymore...
            resetCommonCaches();
        }
    }
}
Bean的创建过程(生命周期中的主要方法)
AbstractApplicationContext.refresh();
//这里的beanFactory就是默认创建的DefaultListableBeanFactory
finishBeanFactoryInitialization(beanFactory);
preInstantiateSingletons();
getBean();
doGetBean();
AbstractAutowireCapableBeanFactory.createBean();
AbstractAutowireCapableBeanFactory.resolveBeforeInstantiation();
//`applyBeanPostProcessorsBeforeInstantiation()`以及`applyBeanPostProcessorsAfterInitialization()`就是在这个方法里面调用的
AbstractAutowireCapableBeanFactory.doCreateBean();
在AbstractAutowireCapableBeanFactory.doCreateBean()方法中有几个重要方法:
//创建bean实例
createBeanInstance();
//执行BeanDefinitionPostProcessors
applyMergedBeanDefinitionPostProcessors();
//依赖注入
populateBean();
//初始化,调用各种aware接口方法,调用InitializingBean.afterPropertiesSet(),调用init-method
//调用applyBeanPostProcessorsBeforeInitialization、applyBeanPostProcessorsAfterInitialization
initializeBean();
AbstractAutowireCapableBeanFactory.initializeBean();

//*******************************************************************************
//如果设置了系统权限,则忽略权限检查,直接执行
if (System.getSecurityManager() != null) {
    beanInstance = AccessController.doPrivileged(new PrivilegedAction<Object>() {
        @Override
        public Object run() {
            return getInstantiationStrategy().instantiate(mbd, beanName, parent);
        }
    }, getAccessControlContext());
}
else {
    beanInstance = getInstantiationStrategy().instantiate(mbd, beanName, parent);
}
//*******************************************************************************

SimpleInstantiationStrategy.instantiate();
//使用反射的方式创建bean实例
BeanUtils.instantiateClass();
ClassPathApplicationContext
AnnotationConfigApplicationContext
参考
数据结构
2019-11-21 网络 tools 数据结构- content
二叉树
概念
-
深度:从根节点到该节点的最长简单路径边的条数,根节点为1,从上往下数
- 深度为n,最多有2ⁿ-1个结点【n≥1】
- 第i层,最多有2的(i-1)次方个结点
- 具有n个结点的完全二叉树的深度为 [log2n]+1,[ ]代表向下取整
- 查找复杂度O(log2n),比数组O(n)要好,一条腿的二叉树就退化为数组了,二叉查找树的查找时间复杂度O(log2n)就是树的深度/高度,简写成logn
-
高度(h):从该节点到叶子节点的最长简单路径边的条数,从下往上数
一棵树的深度和高度是一样的,但是针对树中间的某个节点来说,深度和高度就不一定一样
-
度,也叫阶(n):孩子的个数,孩子个数的最大值就是这棵树的度
- n0=n2+1,一棵二叉树度为0的节点个数=度为2的节点个数加1
- 结点总数=度数*该度数对应的结点数+1,例如
- 层:根节点层数=1,往下依次递增
- 满二叉树
- 完全二叉树
常见查找算法:
- 遍历O(n)
- 二分查找O(log2n),元素必须是有序的,就是二叉树,或者叫二叉查找树
- 哈希查找O(1),最高效
- 索引查找
- AVL树()
- B+树
- B树
- 红黑树
二叉树的特点
- 左子树上所有节点的值均小于或等于它的根结点的值。
- 右子树上所有节点的值均大于或等于它的根结点的值。
二叉树的查找过程
先与根节点比较,比根节点大则从右子树查找,比根节点小则从左子树查找,然后重复上面的过程,一直到找到我们需要的元素为止。
二叉树的新增/删除过程
插入的时候比较简单,从根节点查找插入位置(叶子节点)插入即可。
删除的时候分几种情况:
- 待删除节点只有左子树,直接修改左子树的指针指向父节点即可
- 待删除节点只有右子树,直接修改右子树的指针指向父节点即可
- 待删除节点既有左子树又有右子树,则找出左子树的最大值,或者右子树的最小值,直接替换待删除节点即可,这两个节点正好是待删除节点的前驱和后继
平衡二叉树(AVL树)
一棵AVL树要么是空树,要么是具有下列性质的二叉查找树:它的左子树和右子树都是AVL树,且左子树和右子树的高度之差的绝对值不超过1。
- 平衡因子(Balance Factor,BF):定义为当前结点的左子树高度减去右子树的高度之差,根节点BF=0则代表是平衡的
- 最小不平衡子树:距离插入结点最近的,且平衡因子的绝对值大于1的结点为根的子树,(不平衡即失衡,指BF超出合法值)
- 最小非平衡子树:包含插入结点位置,其根结点的BF是1或-1的最小子树,(非平衡指BF非0,但BF在合法值范围内)
AVL树的插入/删除过程
平衡二叉树的查找过程与一般二叉树一样,但是插入或者删除过程不同,为了保持高度平衡,需要进行树的旋转
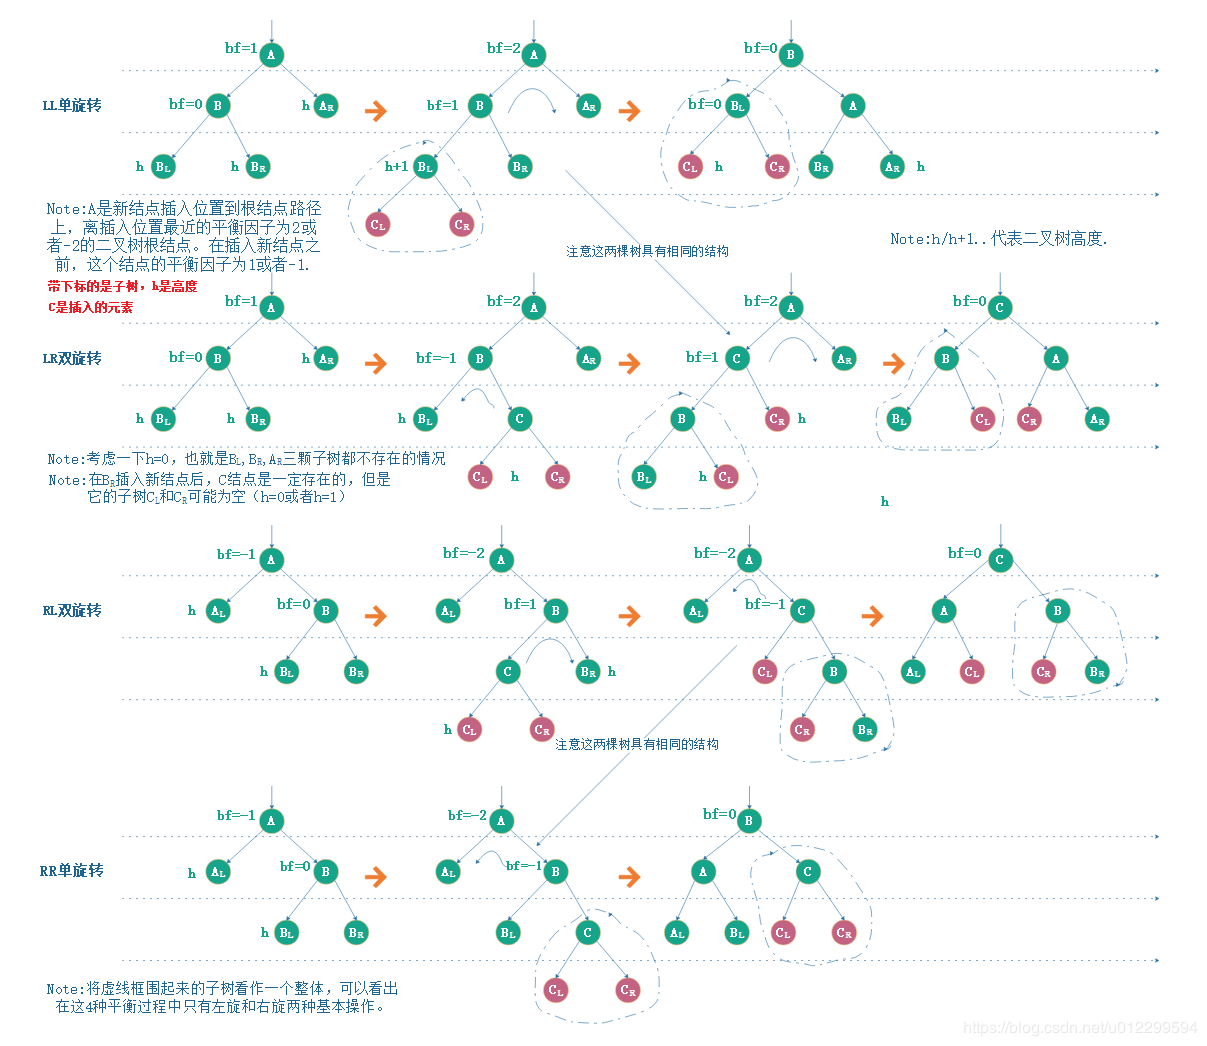
插入时的旋转分为4种情况(基于最小不平衡子树的根节点,也就是bf=2的节点):
- LL:新结点插入在A的左孩子(L)的左子树(L),基于左孩子右转即可
- RR:新结点插入在A的右孩子(R)的右子树(R),基于右孩子左转即可
- LR:新结点插入在A的左孩子(L)的右子树(R),基于左孩子先左转,再基于新的左孩子进行右转
- RL:新结点插入在A的右孩子(R)的左子树(L),基于右孩子先右转,再基于新的右孩子进行左转
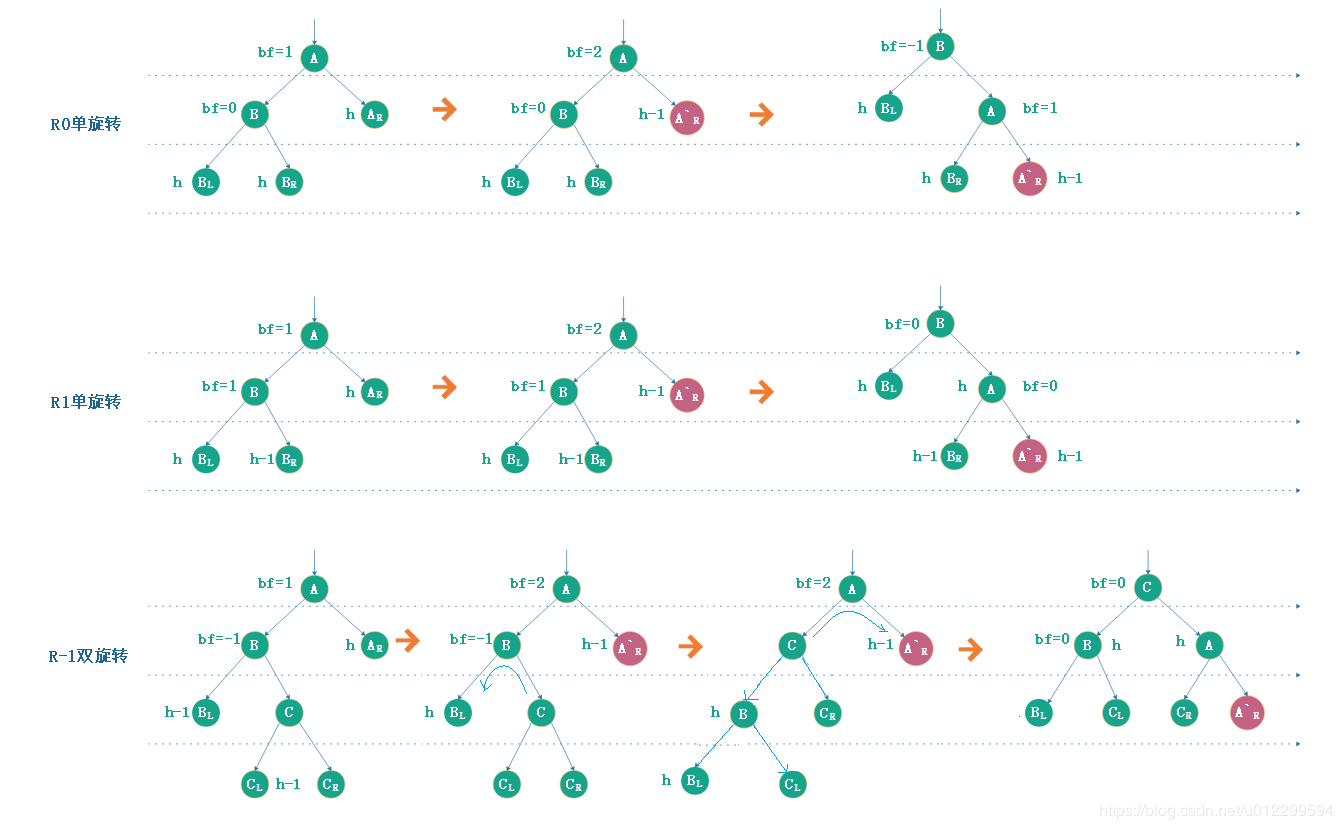
删除时分为6种情况:
- R0单旋转:删除的是A右子树的结点,删除后A的平衡因子为2,并且其左子树的平衡因子为0,一次右旋操作即可重新达到平衡。
- R1单旋转:删除的是A右子树的结点,删除后A的平衡因子为2,并且其左子树的平衡因子为1,一次右旋操作即可重新达到平衡。
- R-1双旋转:删除的是A右子树的结点,删除后A的平衡因子为2,并且其左子树的平衡因子为-1,因为删除后A和B的平衡因子符号不同,所以需要两次旋转才能重新达到平衡。
- L0单旋转:删除的是A左子树的结点,删除后A的平衡因子为-2,并且其右子树的平衡因子为0,一次左旋操作即可重新达到平衡。
- L-1单旋转:删除的是A左子树的结点,删除后A的平衡因子为-2,并且其右子树的平衡因子为1,一次左旋操作即可重新达到平衡。
- L1双旋转:删除的是A左子树的结点,删除后A的平衡因子为-2,并且其右子树的平衡因子为-1,因为删除后A和B的平衡因子符号不同,所以需要两次旋转才能重新达到平衡。
- 一棵n个结点的AVL树的其高度保持在0(log2(n)),不会超过3/2log2(n+1)
- 一棵n个结点的AVL树的平均搜索长度保持在0(log2(n)).
- 一棵n个结点的AVL树删除一个结点做平衡化旋转所需要的时间为0(log2(n)).
红黑树
红黑树也是一种平衡二叉树,但每个节点有一个存储位表示节点的颜色,可以是红或黑。通过对任何一条从根到叶子的路径上各个节点着色的方式的限制,红黑树确保没有一条路径会比其它路径长出两倍,因此,红黑树是一种弱平衡二叉树(由于是弱平衡,可以看到,在相同的节点情况下,AVL树的高度<=红黑树),相对于要求严格的AVL树来说,它的旋转次数少(任何不平衡都会在三次旋转之内解决),所以对于搜索,插入,删除操作较多的情况下,用红黑树。由于AVL树是高度平衡树,所以搜索的效率要高于红黑树。红黑树是功能、性能、空间开销的折中方案。
- 每个节点非红即黑
- 根节点是黑的;
- 每个叶节点(叶节点即树尾端NULL指针或NULL节点)都是黑的; Java 实现的红黑树使用 null 来代表空节点,因此遍历红黑树时将看不到黑色的叶子节点,反而看到每个叶子节点都是红色的
- 如果一个节点是红的,那么它的两儿子都是黑的; 从每个根到节点的路径上不会有两个连续的红色节点,但黑色节点是可以连续的
-
对于任意节点而言,其到叶子点树NULL指针的每条路径都包含相同数目的黑节点;
每条路径都包含相同的黑节点;
实际应用中,若搜索的次数远远大于插入和删除,那么选择AVL,如果搜索,插入删除次数几乎差不多,应该选择红黑树。
红黑树新插入的节点肯定是红色的,否则条件6不满足,每次插入都必须要做一次平衡操作。
插入过程/删除过程
插入节点的情况:
- 新节点没有父节点,也就是第一个root节点,只有一个节点的情况没什么好说的,直接由红变黑
- 新节点的父节点是黑节点,那直接插入,不会打破红黑树的5个规则
-
新节点的父节点是红色节点(关键,需要结合父节点、叔叔节点、祖父节点一起调整)
3.1 叔叔节点是红色
3.2 叔叔节点是黑色
3.2.1 插入的是左孩子3.2.2 插入的是右孩子父节点和叔叔节点是强相关的,变色要同时变,主要是保证特性5
删除节点的情况:
- 要删除的节点有零个子节点
- 要删除的节点有一个子节点
- 要删除的节点有两个子节点(关键)
红黑树应用
Java 中的 TreeMap,TreeSet,JDK 1.8 中的 HashMap
宽度优先搜索、深度优先搜索
宽度优先搜索就是一层一层遍历,可以通过将孩子节点放到队列的方式来实现
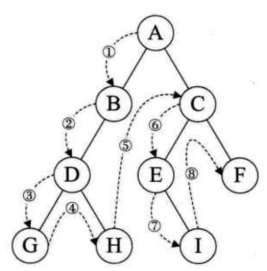
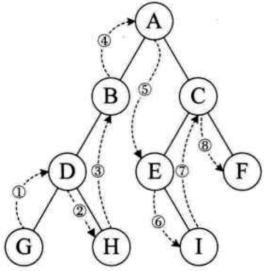
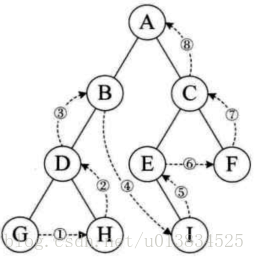
深度优先所搜就是前序遍历(根在前,根左右)、中序遍历(根在中,左根右)、后序遍历(根在右,左右根),有两种方式来实现:
- 递归方法
- 压栈的方式
代码实现参考:二叉树前序遍历、中序遍历、后序遍历、层序遍历的直观理解
深度、高度计算
public int size()                                      //返回二叉树的结点数
{
    return size(root);
}

public int size(BinaryNode<T> p)                       //返回以p结点为根的子树的结点数
{
    if (p==null)
        return 0;
    return 1+size(p.left)+size(p.right);            //左右树分开求
}
public int height()                                    //返回二叉树的高度
{
    return height(root);
}

public int height(BinaryNode<T> p) //返回以p结点为根的子树高度,后根次序遍历
{
    if (p==null)
        return 0;
    int lh = height(p.left);                           //返回左子树的高度
    int rh = height(p.right);                          //返回右子树的高度
    return (lh>=rh) ? lh+1 : rh+1;                //当前子树高度为较高子树的高度加1
}
hash查找算法
hash查找算法是典型的空间换时间的做法,参考代码。
hash函数的构造方法:
- 直接定址法 取关键字的某个线性函数值为散列地址,需要事先知道关键字的分布情况,适合查找表较小且连续的情况。
- 数字分析法 使用关键字的一部分来计算散列存储的位置。 适合处理关键字位数较大的情况。
- 平方取中法 假设关键字是1234,那它的平方就是1522756,再抽取中间的3位就是277 适合不知道关键字的分布,而位数又不是很大的情况。
- 折叠法 将关键字从左到右分割成位数相等的几个部分,然后将这几部分叠加求和,并按散列表表长,取后几位作为散列地址。比如关键字是9876543210,散列表表长为三位,我们将它分成四组,987|654|321|0,然后将他们叠加求和等于1962,再求后三位得到散列地址962。 适合事先不知道关键字的分布,关键字位数叫多的情况。
-
随机数法
这里的随机数是伪随机数
- 除留余数法 此方法为最常用的构造散列函数的方法。
hash冲突的解决办法:
-
链地址法(拉链法)
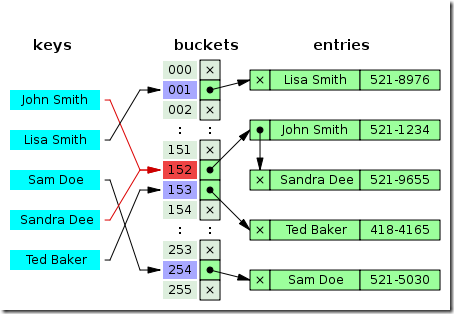
“John Smith”和“Sandra Dee” 通过哈希函数都指向了152 这个索引,该索引又指向了一个链表, 在链表中依次存储了这两个字符串。
-
开放地址法(线性探测法)
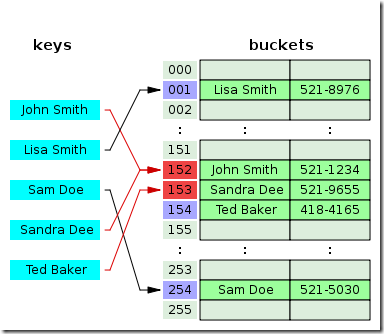
“Snadra Dee”和“John Smith”的哈希值都是152的,但是在对“Sandra Dee”进行哈希的时候发现152已经被占用了,所以往下找发现153没有被占用,所以索引加1 把“Sandra Dee”存放在没有被占用的153上,然后想把“Ted Baker”哈希到153上,发现已经被占用了,所以往下找,发现154没有被占用,所以值存到了154上。
线性探测容易产生“聚集”现象。当表中的第i、i+1、i+2的位置上已经存储某些关键字,则下一次哈希地址为i、i+1、i+2、i+3的关键字都将企图填入到i+3的位置上,这种多个哈希地址不同的关键字争夺同一个后继哈希地址的现象称为“聚集”。聚集对查找效率有很大影响。
所以开放地址法有另外一个版本,二次探测法。二次探测法的地址增量序列为 di = 12, -12, 22, -22,… , q2, -q2 (q <= m/2)。二次探测能有效避免“聚集”现象,但是不能够探测到哈希表上所有的存储单元,但是至少能够探测到一半。
-
再散列函数法
有多个不同的Hash函数,当发生冲突时,使用第二个,第三个,….,等等不同的哈希函数计算地址,直到无冲突。虽然不易发生聚集,但是增加了计算时间。
B树/B+树
排序算法
一些常识:
1(mb)=1024(k)=1024×1024(B、字节、byte)=1024×1024×8(b、位、bit)
int类型占用4(B、字节),也就是4×8=32(b、位)
- 位(bit):是计算机 内部数据 储存的最小单位,11001100是一个八位二进制数。
- 字节(byte):是计算机中 数据处理 的基本单位,习惯上用大写 B 来表示,1B(byte,字节)= 8bit(位)
- 字符:是指计算机中使用的字母、数字、字和符号
- ASCIIS码: 1个英文字母(不分大小写)= 1个字节的空间
- 1个中文汉字 = 2个字节的空间
- 1个ASCII码 = 一个字节
- UTF-8编码:1个英文字符 = 1个字节
- 英文标点 = 1个字节
- 1个中文(含繁体) = 3个字节
- 中文标点 = 3个字节
- Unicode编码:1个英文字符 = 2个字节
- 英文标点 = 2个字节
- 1个中文(含繁体) = 2个字节
- 中文标点 = 2个字节
冒泡排序
public class BubbleSort {
    public static void main(String[] args) {
        int[] arr={10,30,20,100,60,80};
        int n=arr.length;
        int i,j;
        for(i=n-1;i>1;i--){
            for(j=0;j<i;j++){
                if(arr[j]>arr[j+1]){
                    int tmp=arr[j];
                    arr[j]=arr[j+1];
                    arr[j+1]=tmp;
                }
            }
        }

        for(int k :arr){
            System.out.println(k);
        }
    }
}