在Spring5.0中加入了反应堆栈(reactive-stack)web框架Spring WebFlux。它是完全非阻塞的,支持响应流(reactive streams)背压(back pressure),并且可以运行在诸如Netty,Undertow和Servlet3.1+的容器中。在这篇spring webflux教程中,我们将学习响应式编程背后的基础概念、webflux apis和一个完整的hello world示例。
1. 响应式编程
响应式编程是一种编程范式,它增强了异步、非阻塞、事件驱动的数据处理方式。响应式编程包括将数据和事件建模为可被观测的数据流,以及实现数据处理程序来响应数据流中的变化。
在深入了解响应式编程之前,首先来了解一下阻塞和非阻塞请求处理的区别。
1.1 阻塞 vs 非阻塞(异步)请求处理
1.1.1 阻塞请求处理
在传统的MVC应用中,当一个请求来到服务端之后,一个servlet线程就会被创建。它把请求委托给诸如数据库访问这样的I/O处理工作线程。当工作线程工作繁忙的时候,servlet线程(请求线程)保持等待状态所以造成了阻塞。这种方式也叫同步请求处理。

由于服务器可能只有有限数量的线程,这就限制了服务器处理最大负载请求数量的能力。
1.1.2 非阻塞请求处理
在非阻塞或异步请求处理中,没有线程处于等待状态。通常只有一个请求线程来接收请求。
所有请求进来的时候都带有时间处理器(event handler)和回调(callback)信息。请求线程将进入的请求委托给一个线程池(通常有少量的线程),线程池委托请求给处理函数之后立即开始处理其它来自请求线程的请求。
当处理函数完成之后,线程池中的一个线程收集响应信息传递给回调(callback)函数。
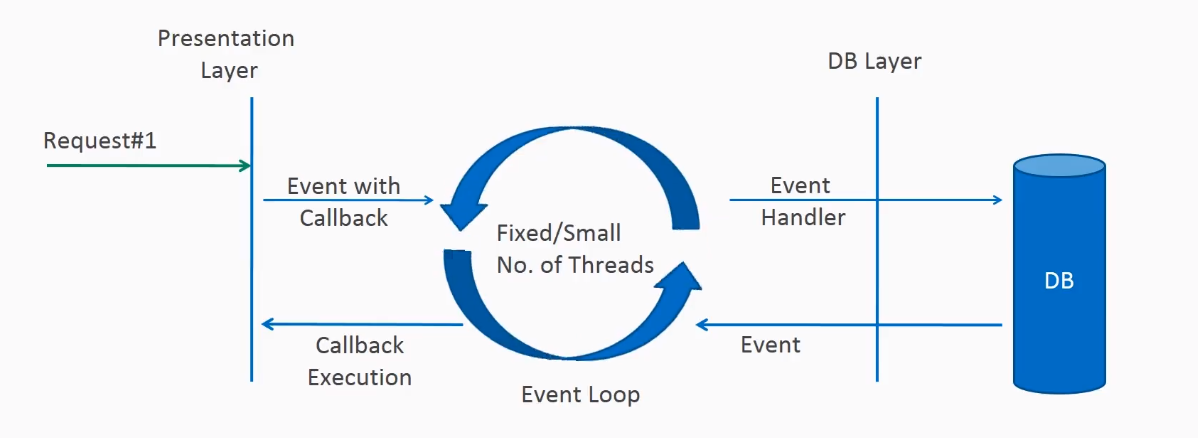
非阻塞的线程提高了应用的性能表现,少量的线程意味着更少的内存开销以及更少的上下文切换。
1.2 什么是响应式编程?
“响应”这个术语指的是围绕响应事件而构建的编程模型。它是围绕“发布-订阅”模式(观察者模式)而构建的。在响应式的编程风格中,我们请求一个资源之后就处理其它事情了,当数据好了以后,我们获取到通知和数据来告知回调函数,在回调函数里面,我们根据应用/用户需要来处理响应。
需要记住的一个重要的事情就是背压(back pressure)。在非阻塞代码中,控制事件的速度以防生产者快速压垮下游变得很重要。
响应式web编程对于那些具有流数据的应用,消费流数据并流转到用户方的客户端都是极好的。但对于开发传统的CRUD的应用不是很好。如果你即将开发的是一个具有大量数据,类似于下一代Facebook或Twitter的应用,那响应式API也许正是你需要的。
2. Reactive Streams API
新的Reactive Streams API由来自Netflix,Pivotal,Lightbend,RedHat,Twitter,Oracle等的工程师创造的,现在已经是Java9的一部分。它定义了4类接口:
- Publisher:根据订阅方(subscriber)的需求发射一系列的事件给订阅方。一个publisher可以服务于多个订阅方。
它只有一个方法:
public interface Publisher<T>
{
    public void subscribe(Subscriber<? super T> s);
}
- Subscriber:接收和处理由publisher发射的事件。注意除非调用
Subscription#request(long)来发出需求信号,否则不会收到通知。
它有4个方法来处理各种接收到的响应。
public interface Subscriber<T>
{
    public void onSubscribe(Subscription s);
    public void onNext(T t);
    public void onError(Throwable t);
    public void onComplete();
}
- Subscription:定义了一个
Publisher和一个Subscriber之间的一对一关系。它只能被一个Subscriber使用一次。被用来发出数据请求和取消的信号(允许资源清理)。
public interface Subscription<T>
{
    public void request(long n);
    public void cancel();
}
- Processor:代表一个由
Publisher和Subscriber组成的处理阶段,遵守两者的接口约定。
public interface Processor<T, R> extends Subscriber<T>, Publisher<R>
{
}
两个比较流行的响应式流(reactive streams)的实现是RxJava、Project Reactor
3. 什么是Spring WebFlux?
Spring WebFlux是SpringMVC的并行版本,且支持完全非阻塞的响应式流。支持背压概念,使用Netty作为内置服务器来运行响应式应用。如果你对Spring MVC编程风格很熟悉,你可以很容易上手webflux。
Spring WebFlux使用project reactor作为响应式库。reactor是一个响应式流的库,所有的操作都支持非阻塞背压。它是在与Spring的密切合作之下开发的。
Spring WebFlux很大程度上使用了两个publisher:
- Mono:返回0或1个元素。
Mono<String> mono = Mono.just("Alex");
Mono<String> mono = Mono.empty();
- Flux:返回0…N个元素。Flux可以连续无止境,它可以一直发射元素。而且它可以返回一系列的元素并在返回所有元素的时候发送一个完成通知。
Flux<String> flux = Flux.just("A", "B", "C");
Flux<String> flux = Flux.fromArray(new String[]{"A", "B", "C"});
Flux<String> flux = Flux.fromIterable(Arrays.asList("A", "B", "C"));

//To subscribe call method

flux.subscribe();
在Spring WebFlux中,我们调用返回monos和fluxes的响应式api/函数,你的controllers会返回monos和fluxes类型的数据。当你调用一个返回mono或flux的api时会立即返回,函数的结果会在数据可用的时候通过mono或flux发送给你。
为了构建一个真正的非阻塞的应用,我们必须以非阻塞的方式创建/使用所有的组件,例如client,controller,service,甚至是db。如果其中一个阻塞了请求,我们就达不到目的了。
4. Spring Boot WebFlux 示例
4.1 Maven依赖
加入spring-boot-starter-webflux, spring-boot-starter-data-mongodb-reactive, spring-boot-starter-test 和 reactor-test依赖
<properties>
    <java.version>1.8</java.version>
    <maven.compiler.source>1.8</maven.compiler.source>
    <maven.compiler.target>1.8</maven.compiler.target>
    <maven.complianceLevel>1.8</maven.complianceLevel>
    <maven.compiler.encoding>UTF-8</maven.compiler.encoding>
    <project.build.sourceEncoding>UTF-8</project.build.sourceEncoding>
    <project.reporting.outputEncoding>UTF-8</project.reporting.outputEncoding>

    <springboot.version>2.0.3.RELEASE</springboot.version>
</properties>

<dependencies>
    <dependency>
        <groupId>org.springframework.boot</groupId>
        <artifactId>spring-boot-starter-webflux</artifactId>
    </dependency>

    <dependency>
        <groupId>org.springframework.boot</groupId>
        <artifactId>spring-boot-starter-data-mongodb-reactive</artifactId>
    </dependency>

    <dependency>
        <groupId>org.springframework.boot</groupId>
        <artifactId>spring-boot-starter-test</artifactId>
        <scope>test</scope>
    </dependency>

    <dependency>
        <groupId>io.projectreactor</groupId>
        <artifactId>reactor-test</artifactId>
        <scope>test</scope>
    </dependency>

    <dependency>
        <groupId>org.glassfish</groupId>
        <artifactId>javax.el</artifactId>
        <version>3.0.1-b11</version>
    </dependency>
</dependencies>

<dependencyManagement>
    <dependencies>
        <dependency>
            <groupId>org.springframework.boot</groupId>
            <artifactId>spring-boot-starter-parent</artifactId>
            <version>${springboot.version}</version>
            <type>pom</type>
            <scope>import</scope>
        </dependency>
    </dependencies>
</dependencyManagement>
4.2 配置
- WebFlux配置
import org.springframework.context.annotation.Configuration;
import org.springframework.web.reactive.config.EnableWebFlux;
import org.springframework.web.reactive.config.WebFluxConfigurer;

@Configuration
@EnableWebFlux
public class WebFluxConfig implements WebFluxConfigurer
{
}
- MongoDB配置
import com.mongodb.reactivestreams.client.MongoClient;
import com.mongodb.reactivestreams.client.MongoClients;
import org.springframework.context.annotation.Bean;
import org.springframework.context.annotation.Configuration;
import org.springframework.data.mongodb.config.AbstractReactiveMongoConfiguration;
import org.springframework.data.mongodb.core.ReactiveMongoTemplate;
import org.springframework.data.mongodb.repository.config.EnableReactiveMongoRepositories;

@Configuration
@EnableReactiveMongoRepositories(basePackages = "com.qigang.webflux2.dao")
public class MongoConfig extends AbstractReactiveMongoConfiguration
{
    @Bean
    @Override
    public ReactiveMongoTemplate reactiveMongoTemplate() {
        return new ReactiveMongoTemplate(reactiveMongoClient(), getDatabaseName());
    }

    @Override
    public MongoClient reactiveMongoClient() {
        //return MongoClients.create("mongodb://user:password@localhost:27017/testdb");
        return MongoClients.create("mongodb://192.168.237.128:27017/testdb");
    }

    @Override
    protected String getDatabaseName() {
        return "testdb";
    }
}
这里可以使用docker启动mongo进行测试:
# 使用docker启动mongo服务器
docker run --name testmongo -p 27017:27017 -v $PWD/db:/data/db -d mongo:latest
# 查看进程
docker ps
# 利用docker镜像中的mongo客户端测试mongo服务器
docker run -it mongo:latest mongo --host 192.168.237.128
- 应用配置
import org.springframework.beans.factory.config.PropertyPlaceholderConfigurer;
import org.springframework.context.annotation.Bean;
import org.springframework.context.annotation.Configuration;
import org.springframework.core.io.ClassPathResource;

@Configuration
public class AppConfig
{
    @Bean
    public static PropertyPlaceholderConfigurer getPropertyPlaceholderConfigurer()
    {
        PropertyPlaceholderConfigurer ppc = new PropertyPlaceholderConfigurer();
        ppc.setLocation(new ClassPathResource("application.properties"));
        ppc.setIgnoreUnresolvablePlaceholders(true);
        return ppc;
    }
}
- 配置文件
server.port=8888
- 日志配置
<configuration>

    <appender name="STDOUT" class="ch.qos.logback.core.ConsoleAppender">
        <encoder>
            <pattern>%d{HH:mm:ss.SSS} [%thread] %-5level %logger{5} - %msg%n
            </pattern>
        </encoder>
    </appender>

    <logger name="org.springframework" level="DEBUG" additivity="false">
        <appender-ref ref="STDOUT" />
    </logger>

    <root level="ERROR">
        <appender-ref ref="STDOUT" />
    </root>

</configuration>
- Spring Boot入口类
import org.springframework.boot.SpringApplication;
import org.springframework.boot.autoconfigure.SpringBootApplication;

@SpringBootApplication
public class WebfluxFunctionalApp {
    public static void main(String[] args) {
        SpringApplication.run(WebfluxFunctionalApp.class, args);
    }
}
4.3 REST controller
import com.qigang.webflux2.model.Employee;
import com.qigang.webflux2.service.EmployeeService;
import org.springframework.beans.factory.annotation.Autowired;
import org.springframework.http.HttpStatus;
import org.springframework.http.MediaType;
import org.springframework.http.ResponseEntity;
import org.springframework.web.bind.annotation.PathVariable;
import org.springframework.web.bind.annotation.RequestBody;
import org.springframework.web.bind.annotation.RequestMapping;
import org.springframework.web.bind.annotation.RequestMethod;
import org.springframework.web.bind.annotation.ResponseBody;
import org.springframework.web.bind.annotation.ResponseStatus;
import org.springframework.web.bind.annotation.RestController;
import reactor.core.publisher.Flux;
import reactor.core.publisher.Mono;

@RestController
public class EmployeeController {
    @Autowired
    private EmployeeService employeeService;

    @RequestMapping(value = { "/create", "/" }, method = RequestMethod.POST)
    @ResponseStatus(HttpStatus.CREATED)
    @ResponseBody
    public void create(@RequestBody Employee e) {
        employeeService.create(e);
    }

    @RequestMapping(value = "/{id}", method = RequestMethod.GET)
    @ResponseBody
    public ResponseEntity<Mono<Employee>> findById(@PathVariable("id") Integer id) {
        Mono<Employee> e = employeeService.findById(id);
        HttpStatus status = e != null ? HttpStatus.OK : HttpStatus.NOT_FOUND;
        return new ResponseEntity<Mono<Employee>>(e, status);
    }

    @RequestMapping(value = "/name/{name}", method = RequestMethod.GET)
    @ResponseBody
    public Flux<Employee> findByName(@PathVariable("name") String name) {
        return employeeService.findByName(name);
    }

    @RequestMapping(method = RequestMethod.GET, produces = MediaType.TEXT_EVENT_STREAM_VALUE)
    @ResponseBody
    public Flux<Employee> findAll() {
        Flux<Employee> emps = employeeService.findAll();
        return emps;
    }

    @RequestMapping(value = "/update", method = RequestMethod.PUT)
    @ResponseStatus(HttpStatus.OK)
    public Mono<Employee> update(@RequestBody Employee e) {
        return employeeService.update(e);
    }

    @RequestMapping(value = "/delete/{id}", method = RequestMethod.DELETE)
    @ResponseStatus(HttpStatus.OK)
    public void delete(@PathVariable("id") Integer id) {
        employeeService.delete(id).subscribe();
    }
}
4.4 service类
import com.qigang.webflux2.model.Employee;
import reactor.core.publisher.Flux;
import reactor.core.publisher.Mono;
public interface IEmployeeService
{
    void create(Employee e);

    Mono<Employee> findById(Integer id);

    Flux<Employee> findByName(String name);

    Flux<Employee> findAll();

    Mono<Employee> update(Employee e);

    Mono<Void> delete(Integer id);
}


import com.qigang.webflux2.dao.EmployeeRepository;
import com.qigang.webflux2.model.Employee;
import org.springframework.beans.factory.annotation.Autowired;
import org.springframework.stereotype.Service;
import reactor.core.publisher.Flux;
import reactor.core.publisher.Mono;
@Service
public class EmployeeService implements IEmployeeService {

    @Autowired
    EmployeeRepository employeeRepo;

    @Override
    public void create(Employee e) {
        employeeRepo.save(e).subscribe();
    }

    @Override
    public Mono<Employee> findById(Integer id) {
        return employeeRepo.findById(id);
    }

    @Override
    public Flux<Employee> findByName(String name) {
        return employeeRepo.findByName(name);
    }

    @Override
    public Flux<Employee> findAll() {
        return employeeRepo.findAll();
    }

    @Override
    public Mono<Employee> update(Employee e) {
        return employeeRepo.save(e);
    }

    @Override
    public Mono<Void> delete(Integer id) {
        return employeeRepo.deleteById(id);
    }
}
4.5 DAO
import com.qigang.webflux2.model.Employee;
import org.springframework.data.mongodb.repository.Query;
import org.springframework.data.mongodb.repository.ReactiveMongoRepository;
import reactor.core.publisher.Flux;

public interface EmployeeRepository extends ReactiveMongoRepository<Employee, Integer> {
    @Query("{ 'name': ?0 }")
    Flux<Employee> findByName(final String name);
}
4.6 Model
import org.springframework.context.annotation.Scope;
import org.springframework.context.annotation.ScopedProxyMode;
import org.springframework.data.annotation.Id;
import org.springframework.data.mongodb.core.mapping.Document;

@Scope(scopeName = "request", proxyMode = ScopedProxyMode.TARGET_CLASS)
@Document
public class Employee {

    @Id
    int id;
    String name;
    long salary;

    public int getId() {
        return id;
    }

    public void setId(int id) {
        this.id = id;
    }

    public String getName() {
        return name;
    }

    public void setName(String name) {
        this.name = name;
    }

    public long getSalary() {
        return salary;
    }

    public void setSalary(long salary) {
        this.salary = salary;
    }

    @Override
    public String toString() {
        return "Employee [id=" + id + ", name=" + name + ", salary=" + salary + "]";
    }
}
5. 测试
启动应用,测试请求和响应
- POST
localhost:8888/create,创建两个employee
{
    "id":1,
    "name":"user_1",
    "salary":101
}

{
    "id":2,
    "name":"user_2",
    "salary":102
}
- PUT
localhost:8888/update,更新employee
{
    "id":2,
    "name":"user_2",
    "salary":103
}
- GET
localhost:8888,获取employee
注意Postman是一个阻塞的客户端,它只会在收集到两个employee对象之后才展示响应结果。为了检验非阻塞响应的特性,在chrome浏览器中访问localhost:8888,结果会在数据可用时以events(Content-Type=text/event-stream)的形式一个一个出现。为了更好展现结果,可以在contorller中添加一个延时。
总结
Spring MVC和Spring WebFlux都支持client-server模式,但是在并发模型以及阻塞特点及线程上有很大不同。Spring MVC假设一个应用可以阻塞当前线程,而Spring WebFlux的线程默认是非阻塞的。这是spring webflux和mvc之间最主要的区别。
响应式以及非阻塞通常情况下不会使程序跑的更快,它的好处是可以使用少量、固定的线程数以及更少的内存开销来扩展应用程序。它让应用程序在一定负载下更有弹性,因为应用可以用更容易预期的方式来扩展。