简单总结一下spring-cloud-stream的基本用法
概念
官方对spring-cloud-stream的应用模型示意图:
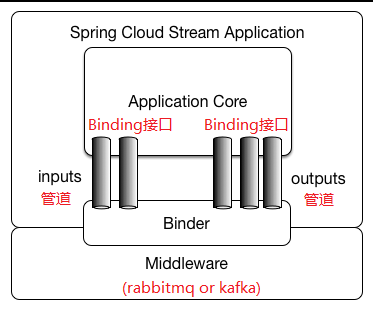
spring-cloud-stream这个项目的初衷是为了屏蔽各种mq中间件的差异,提供一套统一的基于消息驱动的方案,开发人员使用统一抽象出来的方式操作mq,即使更换底层mq中间件也不需要修改代码。但是个人觉得不太适合实际的开发场景,原因有以下几个:
- 更换生产上mq中间件的几率很小,这个问题与更换数据库是一个道理,即使哪天更换了也不是简单的更新组件配置的问题
- 增加了学习成本,从学习到上手rabbitmq并集成到项目中需要花一段时间,spring-cloud-stream里面的各种概念跟rmq区别还比较大,相当于学一个新的组件
- 这个组件的热度不是很高,生产实践性的资料不多,学习过程中发现一些bug,搞清楚原因不太容易,比如content-type问题、监听方法重复注册问题
- Binder:就是消息中间件,rabbitmq、kafka
- Binding
就是一个接口,定义了input、output管道,input代表输入管道,接收消息用的,output代表输出管道,发送消息用的。springcloud stream内置了Source、Sink、Processor三个binding,里面定义了默认名称叫input、output的管道。
不建议使用默认的
Source、Sink、Processor,建议自定义binding,原因是1. exchange名称最好自定义 2. 用Finchley版本spring-cloud测试下来使用默认的Sink队列监听方法有调用两次的BUG
//内置binding
public interface Sink {
  String INPUT = "input";

  @Input(Sink.INPUT)
  SubscribableChannel input();
}
public interface Source {
    String OUTPUT = "output";

    @Output(Source.OUTPUT)
    MessageChannel output();
}
//Processor其实就是继承了Source和Sink,其它啥也没有
public interface Processor extends Source, Sink {

}
当然除去内置的Binding,也可以使用自定义的Binding
public interface Sample {
    String OUTPUT = "sampleOutput";

    @Output(Sample.OUTPUT)
    MessageChannel output();
}
- Channel
发送消息或者接收消息的管道,对于rabbitmq来讲,input、output管道其实都是exchange(类型是topic的exchange),使用默认的input、output管道时可以看到rabbitmq的管理控制台的exchange列表里面多了名称为input、output的exchange,当然也可以在自定义接口中自定义管道名称
- StreamListener:这个好理解,就是监听消息管道的,一般监听input管道
集成rabbitmq示例
producer
添加pom依赖
<dependencies>
    <dependency>
        <groupId>org.springframework.cloud</groupId>
        <artifactId>spring-cloud-starter-netflix-eureka-client</artifactId>
    </dependency>
    <dependency>
        <groupId>org.springframework.boot</groupId>
        <artifactId>spring-boot-starter-web</artifactId>
    </dependency>

    <dependency>
        <groupId>org.springframework.cloud</groupId>
        <artifactId>spring-cloud-starter-stream-rabbit</artifactId>
    </dependency>
</dependencies>
创建一个binding接口,里面定义output管道,这里定义2个不同的管道,发送两种不同类型的消息
import org.springframework.cloud.stream.annotation.Output;
import org.springframework.messaging.MessageChannel;
public interface MyBinding {
    String OUTPUT_1="myOutputChannel1";
    String OUTPUT_2="myOutputChannel2";

    @Output(MyBinding.OUTPUT_1)
    MessageChannel output1();

    @Output(MyBinding.OUTPUT_2)
    MessageChannel output2();
}
创建发送消息的类,启用上一步创建的binding,以及调用的controller
@EnableBinding(MyBinding.class)
public class MySender {
    @Autowired
    MyBinding myBinding;

    public void send(String name){
        myBinding.output1().send(MessageBuilder.withPayload("Hello "+name).build());
    }

    public void send(OrderDTO orderDTO){
        myBinding.output2().send(MessageBuilder.withPayload(orderDTO).build());
    }
}


@RestController
public class ProducerController {
    @Autowired
    MySender mySender;

    @GetMapping("/hello")
    public void hello(){
        mySender.send("lisi");
    }

    @GetMapping("/sendOrder")
    public void sendOrder(){
        OrderDTO orderDTO = new OrderDTO();
        orderDTO.setRestaurant("沙县小吃");
        orderDTO.setCustomerAddress("长丰路100号");
        orderDTO.setOrderDescription("no 香菜");
        mySender.send(orderDTO);
    }
}
配置文件中除去配置eureka信息,还需要配置配置rabbitmq服务器信息、以及管道对应的rabbitmq的exchange信息
spring.rabbitmq.host=192.168.237.128
spring.rabbitmq.port=5672
spring.rabbitmq.username=guest
spring.rabbitmq.password=guest
spring.rabbitmq.virtual-host=/

# 指定默认的output这个管道对应的topic(对于rabbitmq来讲,就是exchange)
# producer端只需要定义output管道的topic对应的exchange就可以了,consumer端需要定义exchange以及queue来订阅topic
spring.cloud.stream.bindings.myOutputChannel1.destination=myExchange1
spring.cloud.stream.bindings.myOutputChannel2.destination=myExchange2

spring.cloud.stream.default.contentType=application/json
consumer
pom依赖与producer端一样
创建binding,定义input管道,接收两个队列消息
import org.springframework.cloud.stream.annotation.Input;
import org.springframework.messaging.SubscribableChannel;
public interface MyBinding {
    String INPUT_1="myInputChannel1";
    String INPUT_2="myInputChannel2";

    @Input(MyBinding.INPUT_1)
    SubscribableChannel input1();

    @Input(MyBinding.INPUT_2)
    SubscribableChannel input2();
}
定义接收消息的方法
@EnableBinding(MyBinding.class)
public class MyReceiver {
    @StreamListener(target = MyBinding.INPUT_1)
    public void onReceive1(String message){
        System.out.println(message);
    }

    @StreamListener(target = MyBinding.INPUT_2)
    public void onReceive2(OrderDTO orderDTO){
        System.out.println(orderDTO.toString());
    }
}
配置文件中配置rabbitmq服务器地址,input管道订阅的exchange名称和queue名称
spring.rabbitmq.host=192.168.237.128
spring.rabbitmq.port=5672
spring.rabbitmq.username=guest
spring.rabbitmq.password=guest
spring.rabbitmq.virtual-host=/

# 指定默认的input这个管道对应的topic(对于rabbitmq来讲,就是exchange)
spring.cloud.stream.bindings.myInputChannel1.destination=myExchange1
# 指定默认的input这个管道对应的【分组】(对于rabbitmq来讲,就是queue),如果不指定的话会使用一个匿名的队列
# 如果不定义分组group(也就是rabbitmq的queue),启动两个consumer应用,producer发送一条消息后两个consumer都会收到消息,如果定义了分组,那么只有其中一个consumer应用会收到消息
spring.cloud.stream.bindings.myInputChannel1.group=myQueue1

spring.cloud.stream.bindings.myInputChannel2.destination=myExchange2
spring.cloud.stream.bindings.myInputChannel2.group=myQueue2

spring.cloud.stream.default.contentType=application/json
对于发送的不同类型的消息,比如示例中的第一个消息是String类型,第二个消息是OrderDTO实体,最好使用不同的exchange和queue,测试过程发现如果使用相同的exchange来投递消息,会有序列化的问题
对象序列化
默认情况下POJO是可以直接序列化的,但是在rabbitmq web ui上面获取消息的时候会发现是java类型对象,没有办法直观看到对象具体内容,如果想在web ui上看到json格式的对象(消息堆积的时候可能需要查看具体队列消息内容),则在consumer端声明channel的group(也就是rabbitmq的queue)的时候指定channel的content-type,producer端不需要动。
spring.cloud.stream.bindings.myInputChannel2.content-type=application/json
@SendTo
consumer端接收到消息之后可以通过@SendTo发送到新的input管道中,可以通过另外一个listener来接收消息
使用rabbitmq的延时消息特性
如果需要发送延时消息,需要做以下事情:
-
1.首先在rabbitmq服务器上启用delayed-exchange插件
-
2.发送消息时给消息设置
x-delay延迟时间
myBinding.output().send(MessageBuilder.withPayload(message).setHeader("x-delay", 5000).build());
- 3.生产者和消费者需要在配置文件中指定exchange类型为delayed-exchange
# producer应用的配置
spring.cloud.stream.rabbit.bindings.myOutputChannel.producer.delayed-exchange=true

# consumer应用的配置
spring.cloud.stream.rabbit.bindings.myInputChannel.consumer.delayed-exchange=true
参考
Spring Cloud Stream RabbitMQ Binder